The transformation of raw materials into exquisite jewelry pieces involves precision, artistry, and technical expertise. Modern jewelry manufacturing combines centuries-old craftsmanship techniques with cutting-edge technology to create pieces that captivate and endure.
Understanding this process reveals why quality jewelry manufacturing process commands premium prices and helps buyers appreciate the value behind each piece. This guide breaks down the complete jewelry production workflow into essential stages, from initial concept sketches to final certification.
Jewelry manufacturing has evolved significantly over the centuries. What began as simple hand-forged items in ancient civilizations now incorporates advanced digital tools and precise machinery. Yet, the core essence remains: turning precious metals and gemstones into wearable art.
This detailed exploration will cover every aspect, including historical context, modern innovations, and practical considerations. Whether you’re a aspiring designer, a curious consumer, or a industry professional, this guide provides in-depth insights into the intricate world of jewelry creation.
Design Conceptualization: Where Art Meets Planning
Every exceptional jewelry piece begins with a concept that balances creativity with practical considerations. The design phase establishes the foundation for everything that follows in the manufacturing process.
This stage is crucial because it sets the tone for the entire production. A well-thought-out design can save time and resources later, while a poorly conceived one might lead to costly revisions.
Manual Sketching and Creative Exploration
Designers start by translating inspiration into tangible sketches on paper. Hand-drawn designs allow for rapid exploration of proportions, stone placement, and decorative elements without technical constraints. This creative freedom helps designers experiment with multiple variations before committing to digital production.
Manual sketching draws from various sources of inspiration, such as nature, architecture, or cultural motifs. For instance, a designer might draw a leaf pattern for a necklace, iterating on the curve of each vein to achieve perfect symmetry.
The initial sketches incorporate market research and customer preferences. Designers analyze current trends, review customer feedback, and consider practical factors like wearing comfort and durability. Budget parameters also influence material selection and complexity levels during this early stage.
Market research might involve studying sales data from previous collections or surveying potential buyers. Trends could include minimalist designs or bold, statement pieces, depending on the season or cultural shifts.
For those starting their jewelry design journey, exploring established premium chains collection styles can provide valuable inspiration for understanding proportions and aesthetic balance that appeal to modern consumers.
Premium chains collections often feature timeless designs like herringbone or rope patterns, which teach newcomers about chain flexibility and weight distribution.
Hand sketching also allows for emotional expression. Unlike digital tools, the physical act of drawing can capture subtle nuances that make a design unique.

Digital Transformation Benefits
While traditional sketching remains valuable for creativity, digital tools offer precision that hand drawings cannot match. The transition from paper to screen marks where artistic vision meets manufacturing reality.
Digital design tools enable designers to visualize pieces from multiple angles simultaneously, experiment with material combinations instantly, and share concepts with clients in real-time. This technological advancement accelerates the design approval process while reducing miscommunication between designers and customers. The ability to render photorealistic images before production begins saves both time and resources by preventing costly mistakes.
Software like Adobe Illustrator or specialized jewelry apps allow for layering different elements, such as adding gemstones to a base metal structure virtually.
One key benefit is scalability. A design can be resized easily without redrawing, accommodating different customer sizes for rings or necklaces.
Collaboration becomes seamless with cloud-based tools, where teams can edit designs remotely, incorporating feedback instantly.
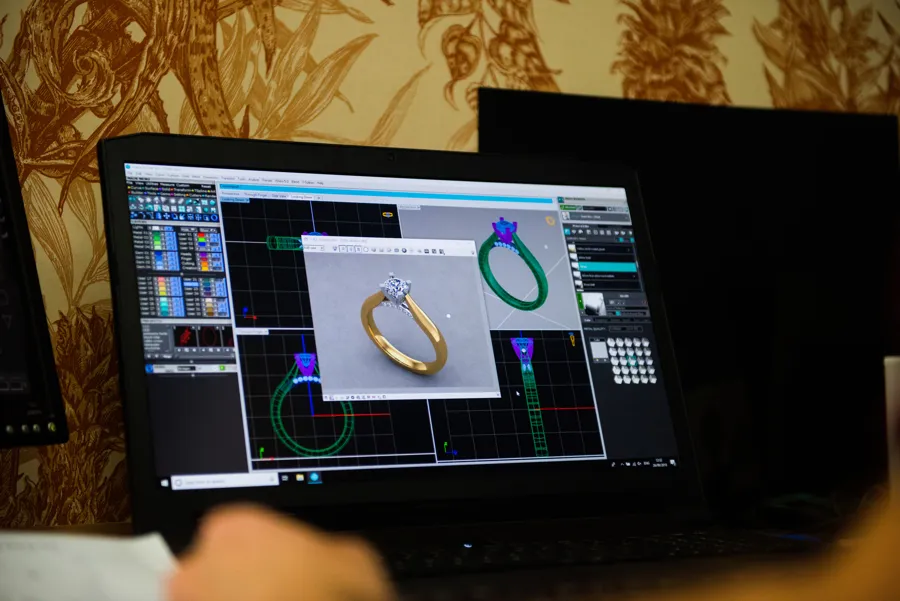
CAD/CAM Technology: Precision in the Digital Realm
Computer-Aided Design (CAD) software revolutionized jewelry manufacturing by introducing unprecedented accuracy and efficiency. These specialized programs allow designers to create detailed 3D models that serve as exact blueprints for production.
CAD software provides several critical advantages: dimensional accuracy maintains precise measurements down to 0.01mm, client visualization enables customers to preview realistic renderings before manufacturing begins, cost evaluation calculates material requirements and production costs instantly, design databases enable exact reproduction of popular designs, and modification flexibility allows changes in minutes instead of hours required for physical prototypes.
Popular CAD programs include Rhino, Matrix, or JewelCAD, each offering unique features like parametric modeling or gemstone libraries.
Computer-Aided Manufacturing (CAM) software integrates with CAD files to automate production equipment. This connection between design and manufacturing eliminates human error in translating concepts to physical pieces. The software controls 3D printers, CNC mills, and other machinery with programmed precision.
CAM ensures that the transition from digital model to physical prototype is flawless, optimizing tool paths for efficiency.
Pre-made setting libraries within CAD programs speed up production for standard elements like prong heads and gallery rails. Designers combine custom elements with standardized components to balance uniqueness with efficiency. This hybrid approach allows for faster turnaround times while maintaining design integrity and uniqueness.
These libraries might include various prong styles, from four-prong to six-prong, ready to be customized.
The integration of CAD/CAM has reduced production time by up to 50% in many workshops, allowing for quicker market response.
Prototype Development: Bringing Designs to Life
Creating physical prototypes allows designers and clients to evaluate proportions, ergonomics, and aesthetic appeal before committing to expensive metal production.
Prototyping bridges the gap between idea and reality, often revealing issues like weight imbalance or uncomfortable edges that aren’t apparent in drawings.
3D Printing and CNC Milling
Modern prototyping relies on two primary technologies. 3D printers build models layer-by-layer using photopolymer resins that mimic wax properties. These printers excel at creating complex geometries with hollow sections or intricate textures that traditional methods struggle to produce.
3D printing, also known as additive manufacturing, has democratized prototyping by making it accessible to small studios.
CNC (Computer Numerical Control) mills carve prototypes from solid wax blocks using rotating cutting tools. Milling offers superior surface finish and dimensional stability compared to 3D printing, making it preferable for designs with large flat surfaces or precise mechanical features.
CNC milling is subtractive, removing material precisely, which can be faster for simpler shapes.
Both methods reduce waste compared to hand carving, as they use exact amounts of material based on digital files.
Hand-Carved Wax for Organic Designs
Despite technological advances, hand carving remains irreplaceable for certain applications. Skilled wax carvers create organic, flowing forms and naturalistic textures that digital tools cannot easily replicate. The tactile nature of carving allows artisans to refine subtle curves and transitions that make designs feel alive rather than computer-generated.
Hand carving often draws from sculptural traditions, where artists like Michelangelo influenced modern techniques.
Hand carving works particularly well for one-of-a-kind pieces where the slight irregularities add character rather than detract from value. Experienced carvers use specialized tools, including heated spatulas, fine detail knives, and custom-shaped scrapers, to achieve effects impossible through digital modeling. The warm, fluid lines characteristic of hand-carved pieces appeal to clients seeking truly unique jewelry with an artisanal quality that mass production cannot replicate.
This method preserves cultural heritage in regions like India or Italy, where generational skills are passed down.
Silver Master Model Creation
For designs intended for production rather than one-time creation, manufacturers cast a master model in silver. This silver master serves as the template from which rubber molds get created. Silver provides durability for the molding process while being cost-effective compared to gold or platinum.
Silver’s malleability makes it ideal for fine details.
Manufacturers must account for metal shrinkage rates when creating masters. Gold shrinks approximately 1.5% during casting, so masters get made slightly oversized to compensate.
Shrinkage varies by alloy; for example, platinum shrinks less, around 1%.
This step ensures consistency in mass production, allowing for hundreds of replicas from one master.
Rubber Mould Creation: Preserving the Master Design
Rubber molds enable efficient production of multiple identical pieces from a single master model. This critical step transforms one-off prototypes into repeatable production items.
Molds are the backbone of scalable manufacturing, reducing costs per piece.
The vulcanizing process subjects natural rubber or silicone sheets to high heat and pressure while sandwiching the silver master between them. This creates a precise three-dimensional negative impression that captures every surface detail down to microscopic texture.
Vulcanization, invented by Charles Goodyear, adapted here for precision work.
Mold makers carefully cut the cured rubber to create an opening that allows wax injection while preventing distortion. Skilled technicians remove any air cavities that could cause defects in wax copies. Proper cutting technique determines whether molds produce dozens or hundreds of pieces before wearing out.
Cuts are often zigzag to maintain alignment.
Material selection impacts mold longevity and detail reproduction. Natural rubber offers excellent detail capture and moderate durability at an economical price point. Silicone rubber provides superior durability and higher temperature resistance, making it the premium option for high-volume production. Metal molds serve very high-volume manufacturing but require expensive initial investment.
Silicone can withstand up to 300 uses, versus 100 for natural rubber.
The greatest advantage of rubber molds lies in design preservation. Manufacturers can store molds for years and reproduce discontinued designs without recreating masters from scratch. This protection proves invaluable when customers request repairs or matching pieces for vintage jewelry.
Archival storage in climate-controlled environments extends mold life indefinitely.
Wax Production and Tree Assembly
Wax replicas bridge the gap between mold creation and metal casting. Each wax copy represents one future jewelry piece, making quality control at this stage crucial for final results.
Wax is chosen for its low melting point and detail retention.
Wax Injection Process
Production begins by cleaning rubber molds and dusting them with talc to prevent sticking. Technicians place molds into commercial wax injector machines that heat wax to proper temperature and pump it under pressure into mold cavities. Vacuum-assisted injectors remove air bubbles that would create surface defects.
Talc acts as a release agent, ensuring clean ejection.
Injection pressure is calibrated to avoid distorting fine details.
Quality Inspection Standards
Each wax piece undergoes examination under magnification. Inspectors check for surface distortion or warping, air bubble pinholes, incomplete filling in fine details, flash (excess wax at mold parting lines), and dimensional accuracy. Defective pieces get melted down and re-injected rather than proceeding to expensive casting stages.
Magnification tools like loupes or microscopes reveal sub-millimeter flaws.
This step prevents propagation of errors to metal stages.
Tree Assembly Strategy
Approved wax pieces attach to a central wax stem called a sprue, creating a structure resembling a tree. Each piece connects via a thin wax rod positioned at an angle to the main stem. This angle ensures smooth metal flow during casting and prevents turbulence that causes porosity.
The sprue acts as a metal reservoir.
Strategic positioning follows weight-based logic. Lighter rings and earrings occupy upper branches while heavy pendants and bracelets sit near the bottom. Proper spacing between pieces (minimum spacing) prevents them from fusing together when molten metal fills the flask.
Spacing is typically 5-10mm to allow even flow.
A single tree typically holds multiple pieces depending on size, maximizing efficiency while maintaining casting quality. Experienced tree assemblers understand how metal flows through the sprue system and position pieces to ensure complete filling without defects. The art of tree assembly balances production efficiency with casting quality. Too many pieces create filling problems while too few waste precious metal and kiln space.
Trees can hold 10-50 pieces, optimizing furnace use.
Investment Casting Preparation
The investment process creates a heat-resistant ceramic shell around wax trees that will contain molten metal during casting.
This shell must withstand temperatures over 1000°C.
Technicians place assembled wax trees into stainless steel flasks, cylindrical containers that confine the investment material. Flask size varies from small to large diameter depending on tree dimensions and production requirements.
Flasks are reusable, made from durable steel.
Investment material consists of plaster-based slurry mixed with water according to precise ratios. The mixture must achieve a pudding-like consistency to flow around wax details without trapping air. Manufacturers slowly pour investment into flasks while the wax tree remains centered to ensure even coverage.
Slurry includes silica for heat resistance.
Vacuum chambers remove microscopic air bubbles from freshly poured investment. Flasks undergo vacuum treatment immediately after pouring. Air pockets would create surface defects on final castings, so thorough degassing proves essential. Most operations perform multiple vacuum cycles to ensure complete bubble removal.
Vacuum time is typically 1-2 minutes per cycle.
Solidification requires several hours, depending on the investment formula and flask size. Rushing this step risks incomplete curing that leads to mold breakdown during casting. Most operations leave flasks overnight to ensure complete hardening and adequate strength for the high-temperature casting process.
Curing at room temperature prevents cracks.

Lost Wax Casting: The Heart of Production
Lost wax casting transforms wax patterns into metal jewelry through controlled melting and pouring. This ancient technique, refined over millennia, remains the most reliable method for creating complex metal forms.
Originating in ancient Egypt and Mesopotamia, it’s also called investment casting.
Wax Burnout Process
Cured flasks enter electric burnout furnaces programmed with specific temperature curves. The process follows three critical phases: wax melts and drains from investment cavities, residual wax vaporizes completely, and the investment achieves a temperature suitable for metal casting.
Burnout takes 8-12 hours, with temperatures ramping to 700°C.
Proper ventilation is essential to remove wax fumes safely.
Metal Selection and Melting
Jewelry manufacturers cast various precious metal alloys tailored to specific applications including 14K yellow gold (58.5% gold, 25% silver, 16.5% copper), 18K white gold (75% gold, 25% palladium or nickel), sterling silver (92.5% silver, 7.5% copper), and platinum 950 (95% platinum, 5% ruthenium).
Alloys are chosen for color, hardness, and cost.
Alloy composition dramatically affects casting behavior, color, and durability. Pure metals rarely get cast because they lack the mechanical strength required for jewelry. Small amounts of additional elements transform soft pure metals into practical alloys that resist wear and maintain their shape under daily use.
For example, copper adds reddish tones and strength to gold.
Casting operators measure precise metal quantities to fill tree cavities. Metal goes into graphite crucibles heated to temperatures above the alloy’s melting point. This superheat ensures metal remains fluid long enough to reach every cavity detail. Temperature control proves critical; insufficient heat causes incomplete filling, while excessive heat damages investment molds and creates casting defects.
Pyrometers monitor temperatures accurately.
Metal Injection Techniques
Preheated flasks receive molten metal through centrifugal or vacuum casting methods. Centrifugal machines spin flasks at high speed, using rotational force to drive metal into cavities. This traditional method works well for most jewelry designs and provides reliable results.
Spin speeds reach 500 RPM.
Vacuum casting pulls metal into cavities using negative pressure rather than centrifugal force. This gentler approach reduces porosity in thick sections and works better for platinum alloys that don’t respond well to spinning. Some advanced casting systems combine both methods for optimal results.
Hybrid systems offer versatility.
Cooling and Quality Verification
Fresh castings cool until the metal solidifies completely. Rushing cooldown causes internal stress fractures in the metal grain structure. Patience during this phase pays dividends in final piece integrity. Proper cooling allows metal crystals to form organized grain structures that enhance strength and durability.
Cooling time varies from 10 minutes for small pieces to hours for larger ones.
Cooled flasks get plunged into room-temperature water, causing the investment to crack and dissolve. The thermal shock breaks ceramic bonds while metal withstands the temperature change. Complete investment removal requires thorough rinsing and sometimes ultrasonic cleaning to eliminate all ceramic residue from intricate details.
Ultrasonic waves dislodge particles effectively.
Casting inspection focuses on structural integrity rather than surface finish. Quality technicians examine pieces for porosity (internal or surface voids from trapped gases), incomplete filling where metal didn’t reach fine details, crystalline defects from improper temperature control, and investment inclusions where ceramic particles are embedded in the metal surface.
Non-destructive testing like X-rays can detect internal voids.
Pieces failing inspection get returned to scrap for re-melting rather than continuing through production. Attempting to fix fundamentally flawed castings wastes time and materials. This quality gate ensures only structurally sound pieces advance to refinement stages.
Recycling scrap maintains sustainability.
Post-Casting Refinement: Transforming Raw Castings
Fresh castings emerge rough and covered with casting texture that requires extensive refinement before resembling finished jewelry. This labor-intensive phase separates acceptable pieces from exceptional ones.
Refinement can take as long as the casting itself.
Sprue Removal and Grinding
Jewelers first cut individual pieces from the casting tree using shears or rotary saws. Each piece retains a nub, the attachment point where it connected to the sprue. This projection must be ground flush without damaging the piece itself.
Precision saws prevent metal distortion.
Motorized grinding wheels spinning at high RPM remove nubs in seconds. Operators hold pieces against progressively finer grinding wheels to eliminate material without creating divots. Coarse wheels remove bulk material while fine wheels blend the area smooth.
Grits range from 80 (coarse) to 600 (fine).
Proper grinding technique maintains the original design surface rather than creating flat spots where curves should exist. This requires skilled hand-eye coordination developed through years of practice. Inexperienced grinding shows immediately in the final product through unnatural contours and surface irregularities.
Training apprentices often starts here.
Filing for Precision
Hand files remove excess metal that grinding wheels cannot safely access. Jewelers use needle files, half-round files, and flat files in various cuts to refine edges, clean out corners, and smooth surfaces.
Files are Swiss-made for quality.
Filing eliminates casting skin (rough oxidized surface layer), excess solder from assembly, sharp edges that could catch on clothing, and parting line flash from mold seams. This purely manual process demands patience and attention to detail. Overzealous filing destroys design details that took hours to create in CAD.
Light strokes prevent gouging.
Assembly and Component Joining
Complex designs are often cast in separate components that require joining. Rings might need shanks attached to heads, pendants require bail loops, and bracelets need clasp mechanisms installed.
Modular assembly allows for customization.
Traditional torch soldering uses silver solder (lower melting point than the jewelry itself) to fuse components. Jewelers heat joints until solder flows via capillary action into the gap between parts. Proper flux application prevents oxidation during heating and ensures clean solder flow.
Flux is borax-based.
Laser welding offers superior precision for delicate assemblies. The concentrated laser beam melts a tiny spot without heating surrounding areas, preventing damage to stones or previously finished surfaces. Modern jewelry studios increasingly adopt laser welders for luxury fashion jewelry despite higher equipment costs because they enable repairs and assemblies impossible with traditional torches.
Lasers operate at wavelengths like 1064nm.
Findings, functional components like earring posts, jump rings, and catches, are attached during assembly. These standardized elements typically come pre-made from specialty suppliers who produce them in vast quantities with consistent quality.
Findings ensure reliability in daily wear.
Pre-Polishing and Surface Preparation
Pieces require significant surface refinement before stone setting can begin. Pre-polishing establishes the foundation for final finish quality.
Smooth surfaces enhance light reflection.
Tumbling for Initial Smoothing
Rotary tumblers filled with steel shot and soapy water burnish castings through mechanical action. Pieces tumble with shot for several hours, with the moving media work-hardening surfaces while smoothing out minor irregularities.
Tumbling media includes pins or balls.
Buffing Techniques
Jewelers hold pieces against spinning buffing wheels charged with polishing compounds. Different wheel materials serve specific purposes, including bristle brushes for recessed areas, felt wheels for flat areas and edges, and muslin buffs for final high polish on broad surfaces.
Compounds like tripoli for initial cut.
Stone Preparation and Cutting
Gemstones undergo their own manufacturing process before jewelry assembly. Understanding stone preparation helps appreciate why quality gemstones command premium prices.
Gems add color and sparkle.
Selection and Sorting
Gem cutters sort rough material by color intensity, clarity grade, and size potential. Natural stones contain inclusions, color zoning, and crystallographic features that cutters must work around. Synthetic alternatives like moissanite offer more consistent properties that simplify cutting and setting. Modern luxury moissanite jewelry collections demonstrate how lab-created stones rival natural diamonds in brilliance while offering superior consistency for intricate designs.
Moissanite has a higher refractive index than diamond.
Sorting uses tools like tweezers and loupes.
Custom Cutting Process
Gem cutting follows a standardized four-stage progression. Sawing slices rough material into blanks sized for target designs. Performing shapes rough blanks into approximate final forms. Sanding smooths away grinding marks while refining facet meets and angles. Polishing creates the final mirror polish that reveals a gem’s full potential.
Facets are cut at precise angles for maximum light return.
Diamond saws use diamond-embedded blades.
Preforming uses grinding wheels.
Sanding progresses through grit levels.
Polishing with diamond powder achieves brilliance.
Stone Setting Techniques: Securing the Sparkle
Setting transforms loose gemstones into permanent jewelry components. The technique choice impacts both appearance and security.
Setters are highly skilled artisans.
Prong Setting Fundamentals
Prong settings use thin metal claws that grip gemstone girdles while leaving maximum stone surface visible. Setters notch prongs to accept stone girdles, position stones level within heads, and carefully bend prong tips over girdle edges.
Prongs can be V-shaped for added security.
Bezel Setting Security
Bezel settings surround gemstone girdles with continuous metal bands that provide maximum security. Setters form thin metal strips into shapes matching stone outlines, solder bezels to jewelry bases, and burnish bezel walls down over stone edges.
Bezels protect edges from chipping.
Pavé Setting Complexity
Pavé settings create continuous stone surfaces using numerous small gems set closely together. Quality pavé work requires microscopic precision. Contemporary urban jewelry styles frequently feature micro-pavé work where stones measure just millimeters in diameter, requiring exceptional skill during the setting phase.
Microscopes aid in placement.
Channel Setting Applications
Channel settings suspend rows of stones between parallel metal walls. This technique suits wedding bands, tennis bracelets, and other jewelry requiring protected continuous stone rows.
Channels are milled precisely.
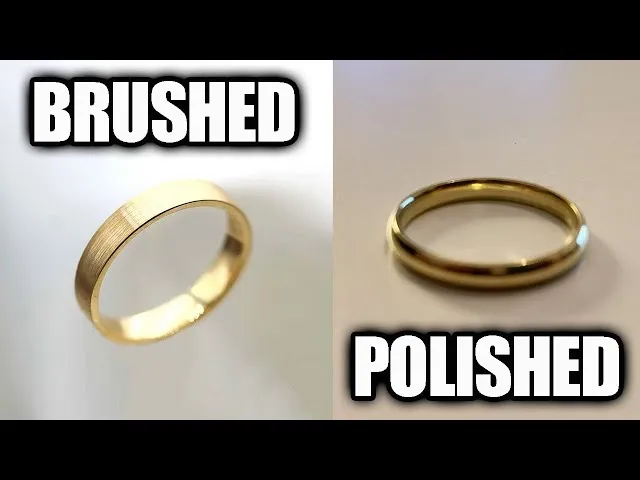
Final Polishing and Finishing
Post-setting polishing brings jewelry to its ultimate visual potential. This final refinement determines whether pieces look acceptable or exceptional.
Polish creates the signature shine.
Professional jewelers maintain extensive buff wheel inventories to address every surface type. Rouge compounds provide the final polish that creates jewelry’s characteristic glow. Red rouge works for gold alloys, green rouge for silver and platinum, and white diamond eliminates microscopic scratches.
Rouge is applied sparingly.
Hand buffing with soft cotton cloths reaches areas that wheels cannot safely access. This meticulous handwork distinguishes fine jewelry from mass-produced pieces.
Final inspection under light reveals imperfections.
Surface Treatment and Plating
Certain metals benefit from surface treatments that enhance appearance and durability.
Treatments extend wear life.
Rhodium Plating Benefits
Rhodium plating deposits a thin layer of rhodium metal over base jewelry through electroplating. The brilliant white color of rhodium exceeds even platinum’s brightness. Rhodium provides exceptional scratch resistance compared to gold or silver.
Thickness is 0.5-1 micron.
The electroplating process requires thorough cleaning, immersion in rhodium electrolyte solution, and electrical current application that deposits metal atoms onto jewelry surfaces.
Current density controls deposition rate.
Quality Assurance and Certification
Comprehensive quality control ensures finished pieces meet established standards before reaching customers.
QA prevents recalls.
Three-Method Inspection
Quality technicians employ three complementary inspection approaches. Measurement verification confirms dimensions match specifications. Visual inspection examines pieces under magnification for surface defects, finish quality, and design adherence. Mechanical inspection tests functionality and durability.
Calipers for measurements.
Metal Assaying
X-ray fluorescence spectrometers verify precious metal content non-destructively. These instruments bombard jewelry with X-rays and analyze emitted radiation to determine elemental composition.
Accuracy to 0.1%.
Traceability systems track metal from the refiner through casting to finished jewelry. This chain of custody documentation proves ethical sourcing and enables compliance with regulations.
Blockchain is emerging for traceability.
Hallmarking and Certification
Hallmarks indicate metal purity and provide visual authenticity confirmation. Gemstone certifications from recognized laboratories document stone characteristics, including the 4Cs for diamonds and origin for colored stones.
Labs like GIA provide certifications.
Final Touches and Presentation
The manufacturing process concludes with personalization and professional packaging.
These add value.
Engraving and Stamping
Custom engraving adds names, dates, or messages that transform jewelry into personal heirlooms. Rotary engravers with diamond or carbide bits cut text or designs into metal surfaces. Laser engravers provide an alternative that works on any metal without physical contact.
Lasers allow for intricate fonts.
Professional Packaging
Finished pieces receive careful cleaning to remove fingerprints and residual compounds before packaging. Ultrasonic cleaners with detergent solution provide thorough cleaning without hand contact.
Packaging reflects brand positioning and protects jewelry during shipping. Documentation, including care instructions, certification copies, and warranty information, accompanies pieces.
Luxury boxes use velvet linings.
The Artistry Behind Every Piece
The jewelry manufacturing process transforms digital concepts into tangible luxury through technological precision and traditional craftsmanship. Each stage requires specialized skills, from CAD designers to stone setters working at microscopic scales.
Understanding this complete workflow reveals why quality jewelry commands premium prices. Hundreds of operations, multiple quality checkpoints, and precious material investment occur before pieces reach customers. For jewelry businesses showcasing their expertise online, implementing a comprehensive SEO content strategy helps educate customers about craftsmanship value.
Effective Instagram bio optimization helps designers communicate their unique approach to profile visitors. Every jewelry piece represents the collaboration of multiple specialists, each contributing expertise to create something that transcends its material.
Historical Evolution of Jewelry Manufacturing
Jewelry making dates back to prehistoric times, with early pieces made from bones and shells. Ancient Egyptians advanced techniques with gold working around 3000 BCE.
- The Renaissance saw intricate filigree work in Europe.
- Industrial Revolution introduced machinery, but handcraft remained key.
- 20th century brought CAD in the 1980s, revolutionizing design.
- Today, sustainability focuses on ethical sourcing and recycling.
Modern Innovations in Jewelry Production
- 3D printing allows rapid prototyping, reducing time from weeks to days.
- AI assists in design, predicting trends from data.
- Lab-grown gems like moissanite reduce environmental impact.
- Nanotechnology in plating enhances durability.
- Blockchain ensures supply chain transparency.
Environmental Considerations
- Mining precious metals impacts ecosystems; recycled metals mitigate this.
- Wax and investment materials are now eco-friendly.
- Energy-efficient furnaces reduce carbon footprint.
- Water recycling in polishing processes conserves resources.
- Ethical labor practices are increasingly standard.
Safety in Jewelry Workshops
- Protective gear for casting prevents burns.
- Ventilation systems remove toxic fumes.
- Ergonomic tools reduce repetitive strain.
- Training on laser safety is mandatory.
- Fire suppression systems are essential.
Economic Aspects of Jewelry Manufacturing
- Premium prices reflect labor, materials, and expertise.
- Mass production lowers costs but reduces uniqueness.
- Custom pieces command higher margins.
- Global supply chains affect pricing.
- Tariffs on imports influence markets.
Cultural Significance of Jewelry
- Jewelry symbolizes status, love, and heritage.
- In India, gold is auspicious for weddings.
- African beads tell stories.
- Western diamonds represent commitment.
- Modern urban jewelry blends traditions.
Tips for Aspiring Jewelry Designers
- Study anatomy for wearable designs.
- Learn software like Rhino.
- Network at trade shows.
- Focus on sustainability.
- Build a portfolio online.
Common Challenges and Solutions
- Defects in casting: Improve temperature control.
- Stone setting issues: Use better tools.
- Design theft: Patent protections.
- Market fluctuations: Diversify products.
- Supply shortages: Stockpile ethically.
Future Trends in Jewelry
- Smart jewelry with tech integration.
- Personalized via AI.
- Sustainable materials like lab diamonds.
- 3D printed custom fits.
- Virtual try-ons.
Case Studies: Famous Jewelry Pieces
- The Hope Diamond: Natural blue diamond, cursed legend.
- Tiffany Yellow Diamond: Custom cut for brilliance.
- Royal crowns: Intricate settings.
- Modern: Lab moissanite in celebrity pieces.
- Vintage reproductions using old molds.
- This expanded guide provides a thorough understanding of jewelry manufacturing, emphasizing the blend of art and science.
For more
For more exclusive influencer stories, visit influencergonewild